
PICTORIAL: EASY GANG SHEET BUILDER FOR DTF & UV DTF TRANSFERS
- Elena Duggan
- Aug 24, 2022
- 8 min read
Updated: Mar 12
CONTENTS:
We're excited to offer a new FREE tool to help you easily create your own gang sheets! Please note: The Gang Sheet Builder works best on a computer and may not function as smoothly on a phone or iPad.

Click this LINK to be redirected to the DTF Gang Sheet Builder.
Click this LINK to be redirected to the UV DTF Gang Sheet Builder.
How to Use Our Gang Sheet Builder
Before we dive in, remember: NEVER MIRROR YOUR IMAGES!
STEP 1: Create an Account with the Build a Gang Sheet (BAGS) App
While creating an account is optional, we highly recommend it! Having an account ensures that all your gang sheets are saved, so you can pause and resume projects, revisit old designs, and easily reorder past projects—what a time-saver!
To create an account, click the 'Sign In' button in the top-right corner of the screen.

In the pop-up window, click 'Register' to create a new account, or log in if you already have one:

STEP 2: Choose the Size of Your Gang Sheet
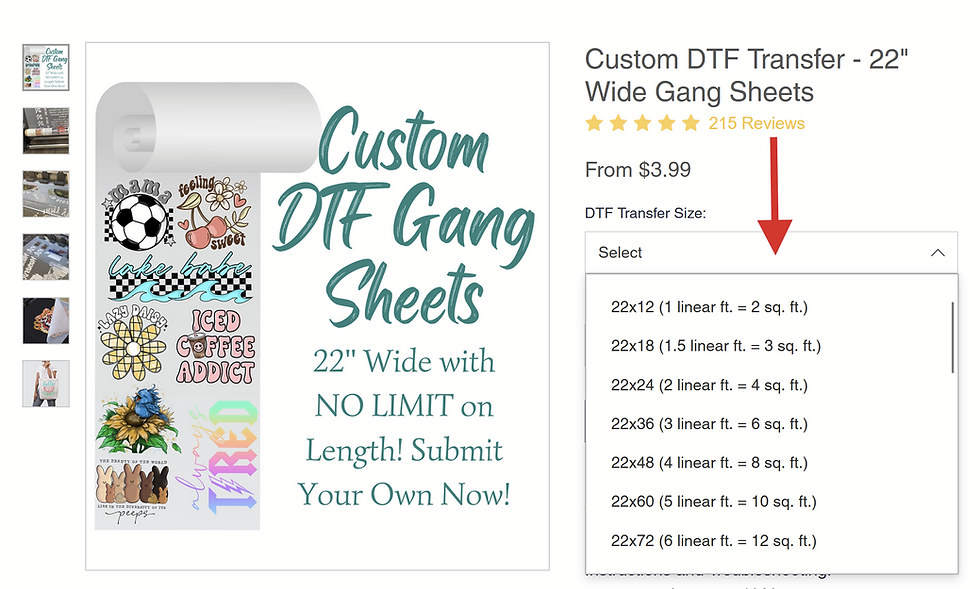
When you open the Gang Sheet Builder, the default size is 22 inches wide by 12 inches long—equivalent to 1 linear foot of a roll or a 2-square-foot order.
To adjust the length of your gang sheet, click the drop-down menu and choose a size between 12 and 240 inches long. Please note that the width is fixed at 22 inches since it is printed on a 24-inch-wide roll.
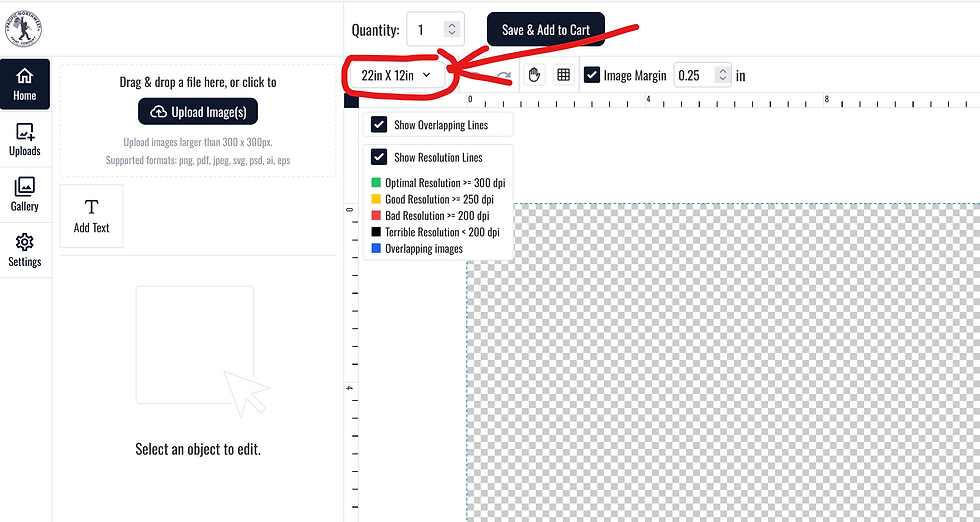
For this demonstration, let's select an artboard that is 36 inches long.

STEP 3: Upload Your Images
Click the black "Upload Image" button in the top left corner of your screen to start adding your high-resolution, transparent background images.
One of the best features of our Gang Sheet Builder is that if you're using high-resolution PNG files, the software automatically removes any negative space in your files—helping you size your DTF transfers just right!

Single-click on a design, and two things will happen:
The design will appear in your workspace.
An image editing menu will appear below your files.

Before we move forward, let's review some key buttons and features in the application that will make building your gang sheet even easier:

Home Tab
This is where you’ll work on your gang sheet.
Current Gang Sheet Size
Easily adjust the size if you need more space—just click the dropdown menu!
Uploads Tab
Click this tab to view larger thumbnails of all the files you’ve uploaded.
Current Design Being Edited
Black dots will appear in all four corners of the design you’re working on.
Undo and Redo Buttons
Quickly undo or redo your actions.
Grid Toggle
Turn the grid on or off as needed.
Margins
Default margins are set to 0.25 inches, providing enough space between transfers for cutting. You can adjust margins, but keep them at least 0.2 inches to avoid difficulty when cutting. A 0.5-inch margin makes cutting transfers apart even easier.
Rotate Image
Rotate your image left or right.
Gallery Tab
We’ll discuss this tab in another blog post, but feel free to explore!
Text Tool
(Add details here if needed.)
Settings Tab
We’ll go over this next.
Image Info Box
This box displays your image’s size, distance from the top and left edges of the gang sheet, and—most importantly—its resolution. Learn more about resolution and DPI [HERE].
Show Overlapping Designs
This important checkbox highlights any overlapping designs. Keep it checked to ensure accuracy.
Resolution Lines
Another critical checkbox to keep checked! The color of the box around your image indicates whether it’s suitable for printing:
Green: Ready for printing.
Yellow: May print okay.
Red, Black, or Blue: Do not submit images with these outlines—results won’t meet your expectations.
Crop Button
Use this tool to trim unwanted parts of your design before printing.
Click the Settings Tab
Here, you can:
Turn resolution and overlapping lines on or off – We recommend keeping these checked!
Change the background color – This won’t print! Your gang sheet remains transparent; the Visual Aid tool simply helps you see your designs better.
Turn the Background Warning on or off – This alerts you if your image has a white background.
Set up your Artboard Margin – Determines how far from the edges your image will load.

Check out this brand new TEXT TOOL!
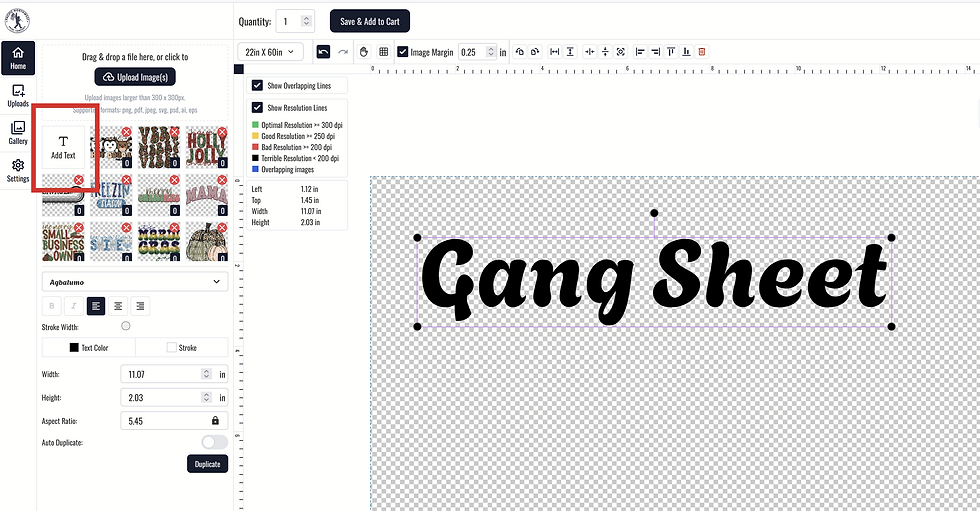
When you select an image in the gang sheet, it will be highlighted with four dots in the corners, and the Edit panel will appear on the screen.

Here, you can rotate, stretch, center, or snap your design to one of the sides of the sheet.
In this box, you'll find the exact size of the design in inches, its margins, and its resolution.
In the Edit panel, you can resize, crop, duplicate, and even edit the colors of your design. Feel free to experiment and explore all its features!
Now, Let's Build Our First Gang Sheet! (step-by-step)
With just a few clicks and some quick resizing, I’ve completed my 22x36 gang sheet!

About the Duplicate and Auto Build Functions
When using the Duplicate function, it's VERY important to remember to apply margins. Be sure to check the box for margins and select a spacing distance that works for you.
My minimum comfortable margin is 0.25-03 inches, as shown in the pictures below.

With this margin, you'll have enough space between the transfers for easy cutting:

If you forget to add margins, your designs will duplicate right next to each other, making it impossible to cut them apart:

Another highly useful function is Auto Build. Click this button to open the Auto Build menu:

This function is much more versatile than the Duplicate button!
With Auto Build, you can easily duplicate multiple sizes of the same image (by clicking the Duplicate button) or even arrange different images—all with just one click!

Check this out! The Gang Sheet Builder has determined that you need a larger size—22x60—to fit all the images you want printed. Click Continue if you agree, or Back & Adjust to modify your sizes and quantities.

How to Submit Your Gang Sheet for Printing
In this section, you'll learn how to send your prepared gang sheet to PNW Print Co using the BAGS (Build a Gang Sheet) tool.
⚠️ Important: This step does NOT complete your order—it only sends your gang sheet to us!
We understand that the "Checkout" process on BAGS might be confusing, but that’s just the wording chosen by the BAGS application. Don't worry—it’ll all make sense as you read on, I promise! 😊
Once you've sent your gang sheet to us, you'll need to complete your order separately on our PNW Print Co website—but we’ll guide you through that step, too!
Before proceeding:
Keep an eye on any warnings at the top of your page. These alerts notify you of:
Overlapping images
Images placed beyond the edges of the artboard
Other important issues

Once all mistakes are fixed, you'll be ready to send your gang sheet to PNW Print Co!
To do so, click the black "Save & Add to Cart" button at the top of the screen. If needed, you can also adjust the quantity of sheets next to this button.
When you click "Save & Add to Cart," a pop-up will appear on your screen.

The first red mark indicates that my images overlap. After reviewing my gang sheet, I determined that it's acceptable to me since I'm confident I can still cut the transfers apart.
The two green marks confirm that my images are high resolution and within the artboard, ensuring none will be cropped. If this mark appears red, revisit your gang sheet to make sure no designs extend beyond the sheet's edges.
⚠️ ATTENTION: By checking the "Print Anyway" box, you assume full responsibility for the final print quality of your DTF transfers, including any issues related to overlapping images, low resolution, or other errors.
3-1. Intellectual Property
Carefully review the entire "MUST READ" statement and confirm by checking the checkbox.
⚠️ IMPORTANT: DO NOT submit any trademarked or copyrighted images! Gang sheets containing unauthorized designs will not be printed.

We must stress this again: if a design infringes on intellectual property laws, it will be excluded, and you will be required to provide a replacement.
If we unknowingly print a design that infringes on trademarks or copyrights, you will be solely responsible for any legal consequences. By submitting your gang sheet, you confirm that you have the legal rights to reproduce all included designs.
PNW Print Co fully complies with legal requirements and retains proof that the customer knowingly submitted the design for printing.
Please be aware that purchasing designs from platforms like Etsy does not automatically grant you legal rights to use them. Some graphic designers create so-called "inspired" designs and sell trademarked or copyrighted content—whether knowingly or not.
Ironically, some of these designers even include "Terms of Use" that claim to grant you, the buyer, permission to use their files for private and commercial purposes. Don't be fooled! If the design contains copyrighted or trademarked elements, the seller is already violating the law, and using those files for printing is still infringement.
Whether you intend to use these transfers for personal or commercial purposes, reproducing copyrighted or trademarked designs remains a serious violation.
We cannot take risks on this matter. Additionally, orders containing copyrighted or trademarked designs will not be canceled or refunded. However, in accordance with our shop policies, store credit will be issued in such cases.
Once you click "Add to Cart & Exit," this page will load:

If you were not logged in, please enter your shipping address information—at a minimum, your name and email. Be sure to use the same name and email associated with your PNW Print Co account so we can correctly match your gang sheet.
Next, adjust the quantities for each gang sheet as needed. When you're finished, click the "Checkout" button.
At this point, your gang sheet will be sent to us. You’ll receive a confirmation email from BAGS and be AUTOMATICALLY REDIRECTED back to our website to complete your order.
⚠️ If you're not automatically redirected, your pop-up blocker may have prevented this. Check your browser settings and allow pop-ups for a smooth transition.
If this happens, you can find a direct link to the listing in the confirmation email sent to you by BAGS—simply click that link to proceed.

How to Place your Order on the PNW Print Co Website After Submitting Your Gang Sheet
The Gang Sheet Builder app is a third-party extension. Once you’ve finished building your gang sheet, you’ll need to return to our website and manually add it to your cart. Sheets created in the app will not be automatically added to the PNW Print Co cart.
As mentioned above, once your gang sheet is submitted for printing, you should be automatically redirected back to our website to complete your transaction.
⚠️ If you are not automatically redirected, check your confirmation email from BAGS. The email contains a direct link to the listing.
In the listing, click the dropdown menu and select the size(s) of the gang sheet(s) you just built.
Then. adjust the quantities for each gang sheet size, and click Add to Cart:

When placing your order, ensure that the sizes and quantities of gang sheets you ordered on the PNW Print Co website match what you created in the BAGS app. This helps ensure smooth order processing and prevents unnecessary delays caused by back-and-forth emails.
Click View Cart, and the next page will load. Adjust your shipping method, add any necessary notes, and then click Checkout.
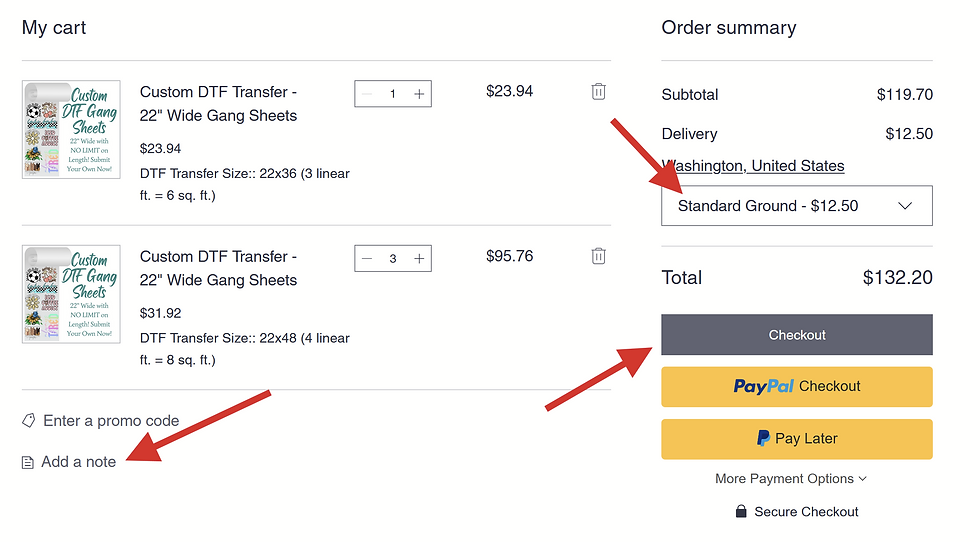
On the next page, enter your details, select your delivery preferences, and provide your payment information—then you're all set!
Have questions? Please email us at: order@pnwprintco.com.
Kommentare